
Add film halation
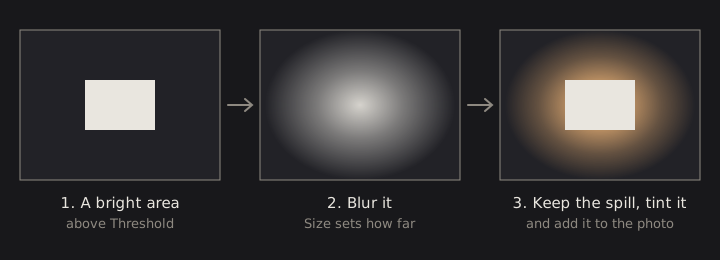
On color film, a very bright light bounces back inside the film and exposes the red layer just outside its edge. The result is a warm halo around bright areas against dark ones. Digital sensors don’t do this, so Halation adds it. It is off until you switch it on.
Add halation
Section titled “Add halation”- Open Halation in the right column.
- Click the power button in the section header.
- Adjust the controls.
| Control | Range | Default | What it does |
|---|---|---|---|
| Intensity | 0 to 2 | 0.50 | How strong the fringe is |
| Size | 0 to 200 px | 15 px | How far the fringe spreads, in pixels of the full-size photo |
| Threshold | 0 to 2 | 0.80 | How bright an area must be to cast a fringe |
| Tint Red, Tint Green, Tint Blue | 0 to 2 | 1.00, 0.25, 0.05 | The color of the fringe (a warm red-orange by default) |

The effect is meant to be subtle. The default Intensity of 0.50 is already fairly strong, and values near 2 look unnatural quickly. It shows most where a bright area meets a dark one.
See only the fringe
Section titled “See only the fringe”Turn on Preview Effect Only to see the fringe by itself on black. It turns off by itself when you change anything outside the Halation section. It can’t be on at the same time as the Glow preview.
Add halation to part of a photo
Section titled “Add halation to part of a photo”Halation works on the layer selected in the Layers pane. See Layers.
Technical details: how the fringe is made
Halation takes the areas brighter than the Threshold, blurs them, and subtracts the original bright areas. What is left is the light that spilled outward. That is multiplied by your Tint and added to the photo, in linear light before the display transform. The fringe never lands on the bright area itself.
The photo is lightly smoothed first, so sensor noise in a bright sky does not turn into red speckle. Size is set in full-resolution pixels and scaled to the preview.