
Use masks
A mask says where a layer’s edits apply. White areas get the full edit, black areas get none, and gray areas get part of it. A layer can hold several masks and combine them.
Add a mask
Section titled “Add a mask”Right-click a layer (or hover over it and click ⋯) and choose Add Mask, then pick a kind:
| Kind | What it selects | Page |
|---|---|---|
| Painted | Wherever you paint | Paint a mask |
| Linear Gradient, Radial Gradient | A ramp or an ellipse | Mask with gradients |
| Luminance Range | A range of brightness | Mask by brightness |
| Smart Select, Subject, Sky, Select | Things the AI finds or you click | Mask with AI |
| Depth Range | A range of distance | Mask by distance |
Once a layer has a mask, the same menu offers Add, Subtract and Intersect submenus instead. Each holds the same kinds and says how the new mask joins the others.
The three buttons beside Layer at the top of the pane (drawn, range and AI masks) make a new layer with that mask. Hold Shift while clicking to add the mask to the selected layer.
A layer with no mask applies everywhere.
Combine masks
Section titled “Combine masks”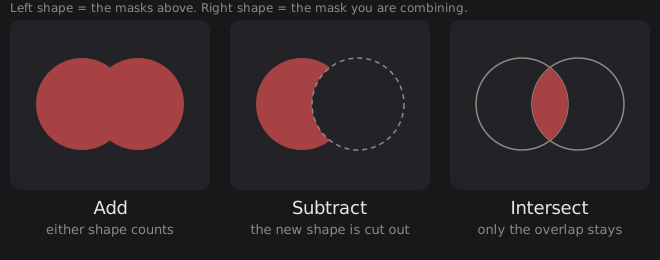
Masks combine from the top of the list down. Each one after the first has an operation:
| Operation | Result |
|---|---|
| Add | The new mask’s area is added to what is already selected |
| Subtract | The new mask’s area is removed from what is selected |
| Intersect | Only the area both masks select stays |
The first enabled mask starts the selection, so it has no operation. Its card says “Starts the mask”. Later masks combine with it.
To change a mask’s operation, open its card and choose Add, Subtract or Intersect. You can also click the small symbol on its row to step through the three, or right-click it and choose Combine.
Typical uses:
- Subtract a Painted mask from a Sky mask to keep the edit off a tree branch the AI merged into the sky.
- Intersect a Radial Gradient with a Luminance Range to brighten only the highlights near the center.

Invert a mask
Section titled “Invert a mask”- To flip one mask, open its card and click the Invert button, or right-click the row and choose Invert. A half-circle mark appears on the row.
- To flip the finished result of all the layer’s masks, right-click the layer and choose Invert Whole Mask.
See what a mask selects
Section titled “See what a mask selects”Press O (by default), choose View › Mask Overlay, or click the overlay button in the Layers header. The active layer’s mask shows as a red tint over the photo. Adding a mask turns the overlay on. Changing a slider in the Edit panel turns it off, so you can see the edit. Press O to bring it back.

Adjust a mask’s strength and edge
Section titled “Adjust a mask’s strength and edge”Select a mask row to open its card under the row.
- Strength scales that one mask before it combines. At 50%, the mask contributes half.
- Expand grows (positive) or shrinks (negative) the selected area. Feather softens its edge. Both appear on Painted, Subject, Sky and Select masks.
- Gradients, Luminance Range and Depth Range have their own controls, covered on their pages.
Hide, reorder and delete masks
Section titled “Hide, reorder and delete masks”- Click the eye on a mask row to switch it off without losing it. If you switch off the first mask, the next enabled one starts the selection.
- Drag a mask row to reorder it. A mask moves only within its own layer.
- Right-click a mask for Duplicate Mask and Delete Mask. Press Delete to remove the selected mask or layer. Image › Undo takes it back.
Technical details: how masks resolve
Each mask is a grayscale image the size of the photo, with values from 0 to 1. DarkRay builds the final mask like this:
- Take the enabled masks in list order.
- For each, flip it if it is inverted (
1 − mask), then multiply by its Strength. - The first one becomes the running total. Each later one joins it:
Add is
total + mask, Subtract istotal − mask, Intersect istotal × mask. - After every step, keep the total between 0 and 1.
- If Invert Whole Mask is on, flip the final total.
The layer’s opacity multiplies the result when the layer is composited.
Two edge cases. If no mask is enabled, the layer is unmasked. If an enabled mask has nothing to give, such as an AI mask whose saved result is missing, the layer gets a mask of 0 and does nothing until you regenerate it (see Mask with AI). Masks that depend on the photo’s pixels, such as Luminance Range, read the result of the layers beneath, so they follow edits you make lower in the stack.