
Tour of the window
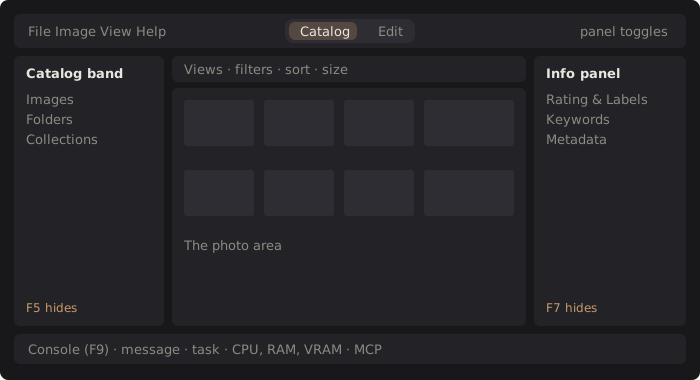
DarkRay has two workspaces, Catalog and Edit, chosen with the tabs in the middle of the top bar. The menus are on the left of the same bar (File, Image, View, Help) and three panel buttons are on the right.
Catalog
Section titled “Catalog”Catalog is where you find, sort and judge photos. It has four views, picked with the buttons at the left of the toolbar or with keys: Grid (G), Loupe (L), Survey (N) and Compare (C), all by default. See Browse the grid.
The left panel holds:
- The catalog band, with the name of the open catalog and a menu to switch, create, open and close catalogs.
- A filter field for the folder and collection names below it.
- Images: All Photographs, Quick Collection, Previous Import, and Missing Photos, which appears only while some file can’t be found.
- Folders and Collections.
The toolbar above the photos shows where the photos come from, as a path, and how many there are (“N photos · M selected”). In the grid it also has the search button, the filter chips, the sort control and the size slider.
The right panel is the info panel for the selected photo: its name and place in the grid, Rating & Labels, Keywords, and Metadata.
Edit is where you develop one photo: the viewer in the middle, the filmstrip under it, the global adjustments in the left panel, and the layers and their adjustments in the right panel. Double-click a photo in the grid, or select it and press E (by default). See Editing.
Show and hide panels
Section titled “Show and hide panels”| Panel | Menu | Key (by default) |
|---|---|---|
| Left panel | View › Panels › Left Panel | F5 |
| Filmstrip (Edit only) | View › Panels › Filmstrip | F6 |
| Right panel | View › Panels › Right Panel | F7 |
| Console | View › Panels › Console | F9 |
A hidden side panel shrinks to a thin strip at the window edge; click the strip or press the key to bring it back. The three buttons on the right of the top bar do the same. Drag the gaps between panels to resize them.
DarkRay shows every panel again at each launch. To keep your layout, set Panel visibility to Remember under File › Preferences… › Appearance.
The status bar
Section titled “The status bar”From left to right:
- The Console button, with counts of warnings and errors logged while the Console was hidden.
- The latest message.
- The running background task, with its progress and a Cancel button when it can be cancelled. Exports, folder syncs, previews and AI jobs all show here. The bar turns orange while something runs, and red after a failure until you click it.
- A readout of CPU, RAM and video memory use. Hover it for DarkRay’s own share. Turn it off with Resource readout under Appearance in Preferences.
- The MCP button, for connecting an AI assistant (see Scripting & MCP).
The Console
Section titled “The Console”The Console is DarkRay’s log, docked above the status bar. When something goes wrong, it says what. The level buttons at the top show or hide information, warnings and errors, and a field filters by text. Open Log Folder shows where the log files are. A click on a red status bar opens the Console at the newest error.
Technical details: themes and where the layout is kept
The colors come from one of four themes (Ember, Night, Graphite and Lifted), chosen under Appearance in Preferences. A theme change applies at once and never changes how a photo looks. The shown or hidden state of each side panel and the filmstrip is kept between launches only when Panel visibility is Remember.